Thursday, February 10, 2022

OSAT Blog Hop - "Slim Shady"


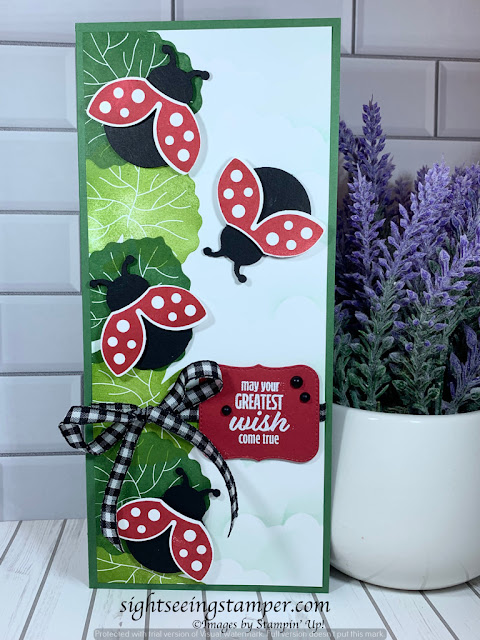
Hello all and a late Happy New Year! I hope your holidays went well and were festive and jolly. This month the team is hopping and the theme is "Slim Shady". We are making slimline cards one of the newest trends in crafting. I just recently did a retreat with a demonstrator friend, Rosie Gonzalez. I was inspired by one of her cards. She did a fun fold, but I figured it would work great as a large, slimline card. Here it is:


I used the "Hello Ladybug" bundle. It is in the new, January to June mini catalog and it is super cute! Those ladybugs are absolutely adorable!  It is a little hard to see, but I sponged clouds along the right side of the card. Rosie taught us that using a stencil made from vellum using our "Basic Borders" dies. It definitely fills all that white space. I'm so glad that the black and white gingham ribbon carried over from the holiday mini catalog. It goes so well with the ladybugs, don't you agree?

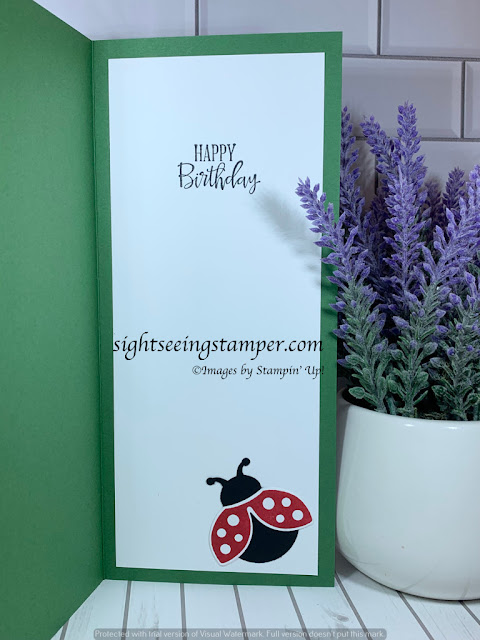
I also decorated the inside of my card also. I can't have naked insides. 


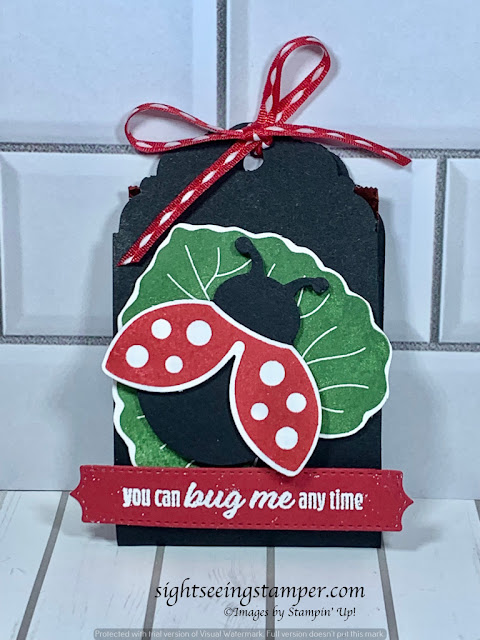
I just had to put another ladybug on the inside! I made a little, treat holder to go along with my darling card:


This treat holder holds a Ghiradelli square. It was super simple to make. I took a two inch wide piece of black cardstock and punched the ends with a tag topper punch. I wrapped it around the chocolate square and decorated it with those darling ladybugs again. Isn't that saying, "you can bug me any time" just the cutest? 

Thanks for checking out my blog. Make sure to hop along to the rest of the team's blogs to see their wonderful creations! 


class="separator" style="clear: both; text-align: left;">

Thursday, November 11, 2021

OSAT Blog Hop - "Season of Cheer"


Hello again everyone! Welcome to our blog hop! This month we are celebrating the holidays! I'm so excited for this month's hop. I'm also excited to celebrate the upcoming holidays! This is my favorite time of year. I love spending time with family and friends and there's just something about the feeling of this time of year. Well, let's get to my projects:


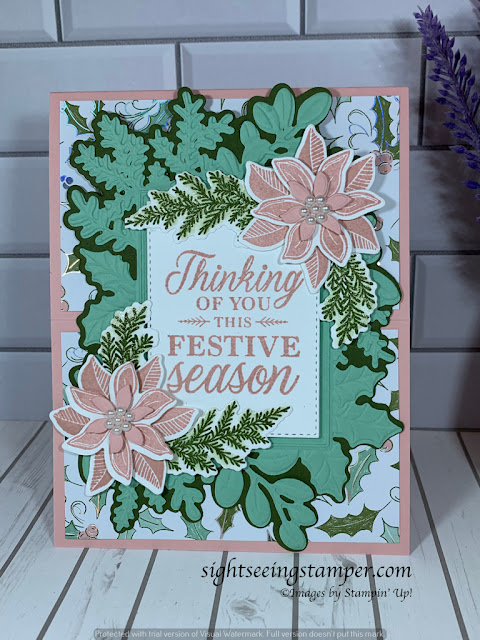
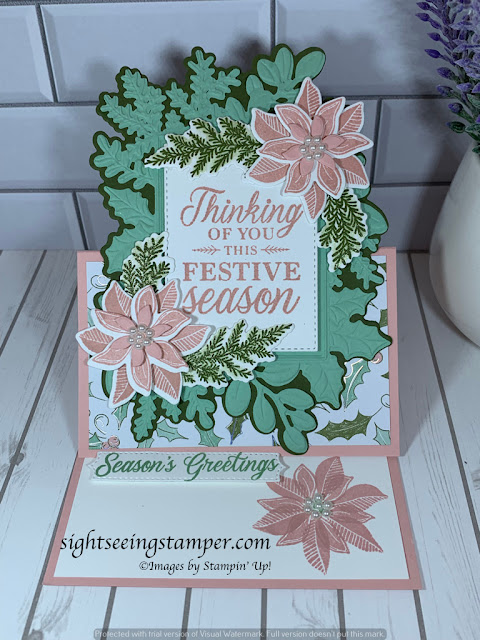
I just love the Merriest Moments Bundle in the July-December Mini catalog! It is so stunning! There is a stamp set with coordinating dies and embossing folder. All these pieces together make for beautiful projects. If you look closely, you can see that I colored the greenery with Wink of Stella. I love how it makes it so shimmery! This card is actually a fun-fold card. I love fun folds! Here is the inside:


Isn't that so cool? It's an easel card. I think it really highlights the beauty of this bundle. Now, onto my next project:


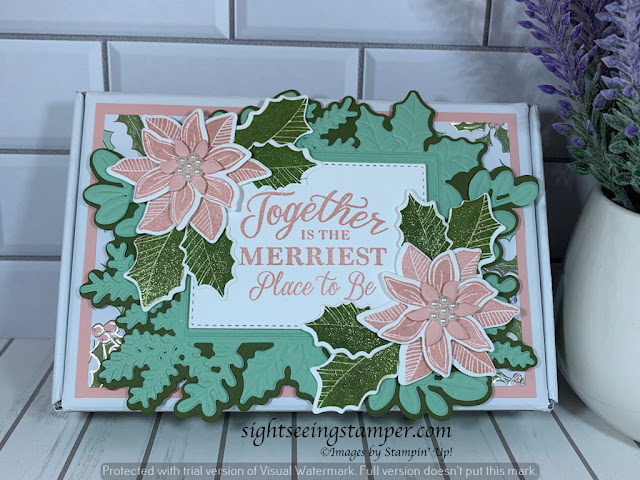
I decorated a mini Paper Pumpkin box much in same way as I did my card. I just turned it horizontal and used another sentiment from the stamp set. I used Wink of Stella on the leaves again and I just love it! So shimmery! I hope you enjoyed my projects today. Don't forget to hop along with the rest of the team!


Thursday, October 14, 2021

OSAT Blog Hop - Ghouls' Night Out


Hello Y'all! I can't believe we are in October already. Where has this year gone? I don't know about you, but it has just flown by for me. I am so excited to be hopping with y'all today. I actually got my projects done early this time. I had just gotten back from a long weekend away with my bestie. We went down to San Diego and it was just lovely. The weather was just beautiful. It still feels like summer here in the desert so I loved our time down there. I came back with my batteries recharged and ready to create.

Here is my card I created:


Isn't this the cutest, little, Halloween card you've ever seen? I love the "Cutest Halloween" bundle! It's so appropriately named, right? I cut out the circles using the "Picture This" dies from the annual catalog. Then I hand cut and punched out the cute, little guys popping out of my circles from the "Cute Halloween DSP". I added a sentiment and then a bunch of cute, little stars and my card was done!

Check out the inside:


You've got to stamp on the inside of your card. I don't believe in naked insides! LOL!

Here is my cute, 3D project:


This is a cute, little treat holder that I found online. It's great because it holds a fun-size package of M&M's perfectly! I made two different ones. One decorated with ghosts, the other with skeletons. I'm not a gory, scary-type Halloween person. This suite is just perfect for me because I like the cutesy Halloween things and decor. 


Here is a side-view of these cuties. They stand up on their own! How fun is that? Well, I hope you like what I have created and shared with you today. Don't forget to hop along with the rest of the OSAT Team!


Thursday, September 9, 2021

OSAT Blog Hop - Step It Up!


Hello everyone! I'm excited to be hopping with the team today. This month we are doing something fun. We are stepping things up! That means we make three cards: a beginner card, a casual card and an avid card. We take a simple card and step it up! 

I decided to use the "Encircled in Warmth" stamp set today. I just love the sentiments in this stamp set. They also coordinate beautifully with the "Encircled in Beauty" dies. Here is my beginner card:


I kept this card very simple. It's something that the beginner stamper would have no trouble recreating on their own. I used the "Joyful Season" stamp and just stamped it on some Basic White card stock. I tied some silver trim around some lovely DSP from the "Peaceful Place" Specialty paper. This paper has some lovely designs in it with silver embossing. I adhered my stamped panel and my card was done. I also stamped the inside of my card: 


My next card is for the casual stamper:


As you can see, I kept the layout of the card the same as the beginner card, but stepped it up a bit. I used a basic gray cardstock base and added a layer of basic white cardstock to layer my DSP on. I then stamped my image and cut it out with the "Layering Circles" dies. I also used the "Encircled in Beauty" dies and added some layers. I added some ribbon and some rhinestones and the front of my card was done.


You can see in the picture above my layered ribbon and dies. I also stepped up the inside of my card with a little trim of DSP:


My next card is for the avid stamper. It has lots of layers, embellishments and was a lot of fun to make:


For my avid card, I added a few more layers from the "Encircled in Beauty" dies, I colored my ribbon with Smoky Slate blends and added a few more rhinestones and the Matte Black dots. I think it turned out really nice. I also used some DSP on the inside of my card:


I hope you enjoyed my projects today. Don't forget to hop along to the other blogs and see how the team has "Stepped up" their projects!


Thursday, July 8, 2021

OSAT Blog Hop - "Christmas In July"


Hello everyone! I am so excited for this month's blog hop. The theme is "Christmas In July". I was going to wait until I could pre-order new items from the upcoming July-December Mini Catalog, but wanted to get my project started in case my stuff didn't get here in time.

I am so excited with how my projects turned out! I had an idea in my head, but wasn't sure what paper to use. My friend, Andrea, gave me the idea of using the "Simply Elegant" paper from the 2021-2022 Annual Catalog. I have to say, this was a brilliant idea! I love how things look! So here we go!

Here is my card:


Isn't this just gorgeous?! I just love this poinsettia. I am so glad this stamp set and dies from the last Holiday mini carried over in the 2021-2022 Annual Catalog. Like I stated above, I used the "Simply Elegant" DSP and popped it up on dimensionals. I then die cut out the poinsettia using Petal Pink card stock. I think it goes so well with the gray. I then used our new Gold 6" x 6" Metallic Specialty Paper to die cut the leaves. Isn't it so gorgeous? It is a brushed metallic paper and just adds a stunning touch to this card. I also used it for the center of my flower.

I finished off the card with a large bow made from the gold "Simply Elegant" trim. 

Here is a close-up of the flower and leaves:


Here is the inside of the card:


My next project uses the "Simply Classic Treat Boxes". I love these cute, little boxes. They are just big enough to put two Hershey nuggets or a Lindt Truffle inside.


I used the Poinsettia dies again to create a smaller version of the poinsettia on my card. I placed it on a belly band using the same DSP and that's it! It was super easy to decorate this box!

I hope you enjoyed my projects today. Don't forget to continue hopping along with the rest of the OSAT Team!


class="separator" style="clear: both; text-align: left;">

Thursday, June 10, 2021

OSAT Blog Hop Boys in the Hood


Hello everyone! We're hopping again today. It's all about the boys this month as you can tell from the title. I wasn't sure what to do at first, but then I decided to use a stamp set that I haven't used yet. This stamp set carries over into Stampin' Up's! 2021-2022 annual catalog. It is called "Enjoy the Moment". I haven't used this set yet because it isn't typically my style, but I have seen some really nice cards using it and thought I'd give it a go. 

Here's my card:


I started by pulling some DSP from the "Beauty of the Earth" DSP paper. This is beautiful paper. I first used the watercolor blue paper for my background. I stamped the "Happy Birthday" sentiment in Misty Moonlight ink and then adhered it to my card base. I then took a strip of Crumb Cake CS and stamped it with a background stamp from the Hostess stamp set, "Natural Textures". I love the texture it gives the card stock. 

I stamped my image using Soft Suede ink and colored it with Crumb Cake Blends. I then ran it through my Cut and Emboss machine with the "Tasteful Textile" 3D embossing folder. I matted the image and then adhered it to my card. I also added some DSP and cardstock strips. I tied on some Linen Thread and then added some sequins to my card. 


I added a stamped piece of Very Vanilla card stock to the inside and my card is done! 

For my 3D project, I made a simple package:


I took a piece of Crumb Cake card stock and wrapped it around my little snack. I then tied it with some linen thread. I ran a piece of Misty Moonlight card stock through my Cut and Emboss Machine with the "Tasteful Textile" 3D embossing folder and adhered it to the top of my package. I cut out a piece of crumb cake cardstock and a piece of "Beauty of the Earth" DSP with the Stitched Rectangle Dies. I stamped the sentiment and cut it out with the "Tasteful Label" dies and matted it and adhered it to the top with dimensionals. A couple of sequins finishes it off!


Here's a quick peek of the inside.

I hope you enjoyed my projects today and that you were inspired to create for the men in your life! 


style="clear: both; text-align: left;">


Thursday, May 13, 2021

OSAT Blog Hop Mash Up!


Hello everyone! It's been a while since I've blogged. I'm excited to be back. This month the theme is "Mash Up". We are to take returning items to the new Annual Catalog and pair them with brand new items. I am excited to show you what I have created.


I paired the returning "Forever Blossoms" stamp set with some new In Colors and some new DSP. I love this stamp set. I love the floral images and the sentiments. I paired it with the new "Hand Penned" DSP. This paper is just beautiful! It has some of our new In Colors this year and the images and just stunning. 


It's a little hard to tell, but I used Wink Of Stella on the flowers. You can never have too much sparkle on a card! I also heat embossed the sentiment using Black Embossing Powder.


Here is the inside of my card. I kept it simple with just a sentiment and a little flower. Now, onto my next project.


I really love this coordinating project. It is a decorated bag. So cute! These are new Ombre Gift Bags. They come in each of the 2021-2023 In Colors and they are so pretty! I made a fancy tag to go on the front that coordinates with my card. I think I am going to be using these bags a lot! 

Well, thanks for stopping by! Don't forget to click on the links below to hop along with the rest of the team. Have a great week!
class="separator" style="clear: both; text-align: left;">


class="separator" style="clear: both; text-align: center;">


Thursday, January 14, 2021

OSAT Blog Hop "Say Hello To..."


Hello everyone and Happy New Year! I hope you all had a wonderful, holiday season. I know we did. It was very relaxing and we had such a wonderful time with the family.

Today we are back with new goodies to show you. The new January - June Mini Catalog is now live. Also, it's Sale-A-Bration! We are going to be showing you projects created using items from the mini and SAB catalogs. I chose to work with the "Hydrangea Hill" Suite of products. I love hydrangeas. I think they are so beautiful. I love to see their bushes in bloom. 

Normally I'm not a lover of the color purple, but I am loving this suite of products. Maybe it's because I don't use purple often and it forces me to use it, but I love the addition of Balmy Blue, Rococo Rose and Seaside Spray. 

Okay, on to my card:


I love the large hydrangea in the stamp set. I added some dimension to the flower by stamping the smaller stamp of petals and placed them on the flower with dimensionals. This stamp set has some wonderful coordinating dies that make creating cards so easy. No fussy cutting!

This card is your standard 5 1/2" x 4 1/4" card. The fun thing about it is that the left side of the card is glued together the first inch in. When you open the card, it is a square on the inside. Check out the picture below:


Pretty cool, huh? 

I made a decorated, mini pizza box to go along with my card. I kept it simple, but I think that big hydragea really packs a punch! The little tag is also from the dies that coordinate with the stamp set. I added some more of that Gorgeous Grape ribbon on the box. It ties so nicely. I also added some Pastel Pearls that are in the suite.


I added a little card stock and DSP to the sides of my box to finish off the look. 

I hope you enjoyed what I have created for you today. I had a lot of fun working with new products from the new catalogs and can't wait to show you what I have created for next time! Make sure you hop along with the rest of the OSAT team to see what other goodies are new.


Thursday, November 12, 2020

OSAT Blog Hop - "Glad Tidings We Bring"


Hello everyone! I hope you are all well and healthy. We are here at the Clove house. We have been very lucky thus far. No one in the fam has gotten Covid-19 or any cooties for that matter. Knock on wood! We are hoping it stays that way. We all want to be healthy for Thanksgiving. 

Do any of you have any travel plans for the holiday? We are just staying here in town. If everyone is healthy, we will get together with the hubby's family and feast until we can't eat anymore! I can't wait! Last year I had surgery a few days before Thanksgiving and my dinner consisted of a few Tablespoons of broth. So not fun! I am looking forward to all the fixin's this year.

Anyhoo...Let's move on, shall we? Today we are sharing projects that are perfect for the upcoming Christmas holiday. I have a few that I would like to share. I admit, I didn't make a 3D item, but I am going to share with you some projects that everyone could use...gift card/money holders. Here's my first project:


This is a money holder card. It fits in a standard, business envelope. It is perfect for putting a little cash in! We are making this for class this month. I kept it pretty simple, but I think it's still very pretty. I love the blues used to make this card. They are not your traditional Christmas colors, but I think they are so pretty.

I used the ornament image from the "Ornamental Envelopes" and the sentiment is from "Wrapped In Christmas".


Here is the inside of the card. It is pretty simple. The die cut, blue card stock is the pocket to hold some cash. I thought it was cute!

So my next project is a gift card holder:


This is a gift card holder. A fellow demonstrator, Wendy Lee, had this idea on her blog. She didn't have any measurements, but I thought, "I can figure that out!" And I did! It is one piece of 5 1/8" x 12" DSP scored and folded to make two pockets. It is all held together with the ribbon at the bottom. 

I made two inserts to fit in the pockets. One to write on and one to stick a gift card onto. You just need a glue dot for that. 


What a great way to showcase our beautiful Designer Series Paper! 

Here is my last project I want to share with you:


This is another gift card holder. Isn't that polar bear just adorable? I love the little critters in the "Warm & Toasty" stamp set! They are just darling. 

I used our gorgeous Feels Like Frost DSP for the front of the card. I just love this paper. So many beautiful, photographed images on one side and white and silver on the other. 

I colored my polar bear with Night of Navy and Seaside Spray Blends. I used the light Flirty Flamingo for his little cheeks. :) 


Here is the inside of the card. As you can see, a gift card will go in the slot on the left. (That white piece of paper you see there is the size of a gift card.) I used the Classic Label Punch to make the slot for the gift card to go in. The shape is not long enough if you punch it once, but you just need to move the punch to the side and punch again until you have a slot large enough to slide the gift card in. Easy peasy!

The sentiment is raised up using dimensionals only on the right side. The front panel stays closed by tucking the polar bear panel underneath the sentiment.


Well, I hope you liked by projects today and that you are inspired to go and create some cute gift card holders for your friends and family. I hope you all have a happy and healthy Thanksgiving!